In this blog, we will be learning about Adaptive Cards and how to send an adaptive card Form in MS Team's chat and get response details.
Our business scenario involves obtaining project status details from project leads on a monthly basis. Previously, these updates were collected via email and manually recorded in an Excel file. Now, we have implemented a more efficient solution: project status updates can be submitted directly within MS Teams using- an Adaptive Card, and the information is automatically saved into a SharePoint list.
Here, we will be creating two Power Automate flows:
- To send Adaptive card in MS Teams to group members
- To get project status using Adaptive card
Create Flow
1). Sign in to Power Automate
2). Open the flow, click on the Create option, and select "Scheduled Cloud Flow".
Enter Flow name.
Set the flow recurrence interval as monthly.
Click on the Create button.
3). Add an action "List group members" and enter team name from the dropdown in Group Id parameter. Its used to get all the members details present in the teams in an array.
4). Add "Apply to each" loop and enter previous step output value as input value.
5). Add an action "HTTP" and enter the parameter values as per table. The URI value will be generated automatically in the second flow in step 8.
| Method |
POST |
| URI |
https://prod-99.india.logic.azure.com:443/workflows ... |
| Headers |
{
  "Content-Type": "application/json"
}
|
| Body |
{
  "email": mail_value_from_ListGroupMembers
}
|
| Authentication |
None |
6). The first complete flow with all the actions will look like below.
7). Create another flow, click on the Create option, and select "Automated Cloud Flow".
Enter Flow name.
Choose the flow trigger as "When a HTTP request is received". The trigger is not directly available.
So, click on the Skip button.
Now in the Power Automate flow designer search for the flow trigger again. Here, you will find it.
8). In the trigger set the parameter values as shown below.
HTTP POST URL will be generated automatically and will be used in step 5
{
"type": "object",
"properties": {
"email": {
"type": "string"
}
}
}
9). Now, add an action "Post adaptive card and wait for a response".
Add mandatory parameter values as shown in below image. Refer step 11 for details.
10). Add an action "Get user profile (V2)" and enter User (UPN) value as project manager dynamic value from above step.
Then, add "Create item" action to save the record in the SharePoint list.
Now we will discuss how to create Adaptive Card parameter value.
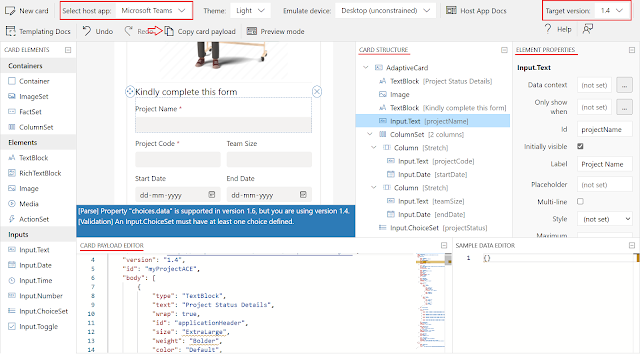
11). Open Adaptive Cards Designer portal.
Select host app as "Microsoft Teams" and Target version as 1.4
Then, create the Adaptive card design according to your requirements.
Once Adaptive Card design is complete. Click on "Copy card payload" and paste it into the Adaptive Card parameter value (Step 9).
The Id property of an element or control is crucial, as its utilized when accessing control values within a flow.
| Get project status using Adaptive card - CARD PAYLOAD |
{
  "type": "AdaptiveCard",
  "$schema": "http://adaptivecards.io/schemas/adaptive-card.json",
  "version": "1.4",
  "id": "myProjectACE",
  "body": [
    {
      "type": "TextBlock",
      "text": "Project Status Details",
      "wrap": true,
      "id": "applicationHeader",
      "size": "ExtraLarge",
      "weight": "Bolder",
      "color": "Default",
      "horizontalAlignment": "Center",
      "separator": true
    },
    {
      "type": "Image",
      "url": "https://cdn4.iconfinder.com/data/icons/alter-3d-scenes/256/business___
	  graph_chart_analytics_statistics_presentation_project_3d_people2x.png",
      "id": "projectImage",
      "separator": true,
      "horizontalAlignment": "Center"
    },
    {
      "type": "TextBlock",
      "text": "Kindly complete this form",
      "wrap": true,
      "separator": true,
      "size": "Large",
      "color": "Dark",
      "horizontalAlignment": "Left",
      "fontType": "Default",
      "weight": "Default",
      "id": "formHeader"
    },
    {
      "type": "Input.Text",
      "id": "projectName",
      "label": "Project Name",
      "isRequired": true,
      "errorMessage": "This is required"
    },
    {
      "type": "ColumnSet",
      "columns": [
        {
          "type": "Column",
          "width": "stretch",
          "items": [
            {
              "type": "Input.Text",
              "id": "projectCode",
              "isRequired": true,
              "label": "Project Code",
              "errorMessage": "This is required"
            },
            {
              "type": "Input.Date",
              "id": "startDate",
              "label": "Start Date"
            }
          ]
        },
        {
          "type": "Column",
          "width": "stretch",
          "items": [
            {
              "type": "Input.Text",
              "id": "teamSize",
              "label": "Team Size"
            },
            {
              "type": "Input.Date",
              "id": "endDate",
              "label": "End Date"
            }
          ]
        }
      ],
      "id": "projectColumnSet"
    },
    {
      "type": "Input.ChoiceSet",
      "choices": [
        {
          "title": "Active: The project is currently being worked on by the project team",
          "value": "Active: The project is currently being worked on by the project team"
        },
        {
          "title": "Completed: Work on the project has finished, and all deliverables/tasks
                    have been completed",
          "value": "Completed: Work on the project has finished, and all deliverables/tasks
                    have been completed"
        },
        {
          "title": "Cancelled: The project has not finished, and work on the project will
                    not continue",
          "value": "Cancelled: The project has not finished, and work on the project will
                    not continue"
        },
        {
          "title": "On Hold: The project has not finished, and work on the project has
                    been temporarily suspended",
          "value": "On Hold: The project has not finished, and work on the project has
                    been temporarily suspended"
        }
      ],
      "id": "projectStatus",
      "label": "Project Status",
      "isRequired": true,
      "errorMessage": "This is required"
    },
    {
      "type": "Input.ChoiceSet",
      "choices.data": {
        "type": "Data.Query",
        "dataset": "graph.microsoft.com/users"
      },
      "id": "projectManager",
      "label": "Project Manager / Account Manager",
      "isRequired": true,
      "errorMessage": "This is required",
      "isMultiSelect": false
    },
    {
      "type": "Input.Text",
      "isMultiline": true,
      "id": "comments",
      "label": "Comments(if any)"
    },
    {
      "type": "Input.Toggle",
      "title": "I accept the terms and agreements",
      "id": "acceptTerms",
      "isRequired": true,
      "errorMessage": "You must accept the terms to continue.",
      "label": "Please check the box below to accept the terms and agreements:"
    }
  ],
  "actions": [
    {
      "type": "Action.Submit",
      "title": "Save",
      "id": "save",
      "iconUrl": "data:image/png;base64,iVBORw0KGgoAAAANSUhEUgAAABQAAAAUCAYAAACNiR0NAAAAAXN
	  SR0IArs4c6QAAAhhJREFUOE9jZKAyYKSyeQwoBprMuO3/n4FBg+/XG9cYAyElXoYffDALX//jfoNs+ZpLr59
	  8ZxVIOZGp+QBZHG6gybTbfgxMDBtBkmK/XjD0eEkxPHjyBK7WzMAAxTNxiy4xvGSTfMD6/7cjsqEIA2fermf
	  4z9AAM7DVVZTh2LlzcEPCvb0xDHzFJsHwn4ERxVCEgdNvNzAwMtSDdDF/eMSwLEaT4eylSwx//v1lEODlYzD
	  T14Mb+OvPP4aA2ecY/gnKQcT+MzSeyVQFOwargd/fPmUwleZkcNcQYWBhZkJx2Z+//xh2Xn/NcObZDwYOYWn,
	  cBhpNvDqPiZ0tEWzhvz8Mf75/Yfj/7x/WRMDIxMzAwsnDAKJB4N/PX/PP5WsnobhQr//8ATZOHntyktGv718
	  OXio0dKCvgRI8zAy8bNjT/edf/xlefPmLiCRCLsw14WXwVuHE6/stt78zTDn7GayGoJc3h4ky/P31i+Hjp09
	  YDeXn42NgZmNj8F31mjgDd0SIMfz+/Yfh67dvWA3k5uJiYGVlYfBY8Yp4Az9/+crw7PkLrAZKSUow8PJw4zd
	  Qv/fMelZu/gCQCSAXEgNgLvz59eP6y8UmQSjJRrd5TwAjB+96ZlZ2hkYbbmLMY6g/8pXh7+8fDH9/fPK/Wuu
	  2CcVAEEejcacvw///FolanEQl8PnXvh9kYGA8fqPBfQvMBbQtYInyJwFFAGUS8BXW+cfxAAAAAElFTkSuQmCC"
    }
  ]
}
|
12). The second complete flow with all the actions will look like below.
Now it's time to test the flow. Manually run the flow and wait for sometime.
Project Status form in Adaptive Card output for Teams web application.
Fill out the form and click Save button. Error message will be shown if mandatory fields are not filled.
Check the second flow history and move to action "Post adaptive card and wait for a response".
Open "Show raw outputs" and you can see that the saved form response is in the data node.
People Picker in Adaptive card returns the Microsoft Entra ID (Azure Active Directory) of the user selected. Due to that the user details are fetched using "Get user profile (V2)" action and its output is used.
Refer Adaptive Card blog series:
Adaptive Card: Power Automate send welcome message when new team member added
Adaptive Card: Power Automate send birthday greetings to team members
People Picker in Adaptive Cards
Adaptive Card: Send Form using Adaptive card in MS Teams to group members
I hope this will help all of you! 🧲
Feel free to provide feedback.
🚀 "Happy Coding" 🚀


